Here are a few examples showing a scrolling page. These examples are built with absolute and relative positioned elements. Motion is handled with jQuery, using the scrollTop, and scrollLeft properties.
Category: CSS
CSS Position Examples
The following series of Codepen examples try to explain the use of absolute and relative position. Visit each of these, read the code, make changes in codepen, and see what happens. Next try and recreate these for yourself.
- Static position – This is the default position
- Relative position – Relative position offsets an object from where it would have appeared if it has used static position
- Relative position with nested objects – What happens to elements inside relatively positioned element?
- Absolute position – Absolute position positions an element absolutely
- Absolute position – Elements positioned with absolute position can be positioned from their left, top, right, or bottom edges
Parse.com
 Parse.com is a service that wants to provides a backend for your social media apps. It’s my opinion that Parse is the easiest and fastest way for designers to get into creating social media apps and web sites.
How do we do it now?
The standard method to create a social media app or web site is to create a database and access the database using code written in MySQL. You also need code written in PHP to facilitate transactions with MySQL and manage content from the database. Together this is called the backend. All of these processes happen on a remote computer, your web host.
To have something people can look at you use HTML, CSS, and Javascript. This is called the frontend. You use HTML to structure your web pages, CSS to style them, and javascript to add functionality.
Let’s sum that up. To make a web site that has social media features you need (from front to back):
- HTML – Structures your data in the browser
- CSS – Styles the content in the browser
- Javascript – Adds functionality to the browser
- PHP – Handles backend services and transactions with the database
- MySQL – Stores and organizes data
Parse.com
Parse.com provides a service that removes the need for backend programming from the equation. With Parse all of the backend code is handled by the front end. Parse calls itself a: BaaS, which stands for Backend as a Service. The Parse service provides a ready made and hosted backend that can be used to build just about any type of social media app or web site.
Parse saves time by not requiring that you write backend code for creating and configure databases and tables. Parse provides ready made systems for managing user accounts and login. Creating a user login with Parse is as simple as creating the login or sign up form in HTML, CSS, and adding a few lines JavaScript.
For the record, I do not works for Parse and receive nothing from them. As an educator I see Parse as being the easiest way for students to make their social ideas into truly functional apps. For anyone else trying to make their social media ideas into real functioning work, Parse removes many of the roadblocks.
Who would benefit from Parse
Anyone wanting to get started making a social media network would benefit. Parse is well suited to small groups or individuals who want to get started making a social media site. If your skills are more frontend oriented, HTML, CSS, JS, then Parse will save you the trouble of learning PHP, MySQL.
Parse is targeted at startups and small teams looking to create new social media platforms quickly and easily. I see it as a perfect fit for students, as the focus of our students is on front end design and programming. Building an app with Parse moves all of the work of creating a social media app into the front end, and concentrates programming tasks into a smaller set of more familiar tools: HTML, CSS, and JS.
How does Parse work?
In short the Parse service works with Javascript. Essentially you create objects you wish to save in Javascript, and the Parse server takes care of the rest. To display data from the server you request objects from the Parse server through Javascript. Obviously there is a more to it than those two sentences, but not much more.
What kind of things can you make with Parse?
Any social media web site or App. Parse provides libraries code for Xcode, and Android. You can make mobile Application with much less effort, and I’ll say it again, without having to create a backend service, and database. Check out this page of customers using Parse:
Hello Kitty is using Parse!
Famo.us – Scrollview
Famo.us
I really like the look of Famo.us, I just haven’t had the time to play with it much. I had some time today, and thought I should wait no longer! Having already done the tutorials on the Famo.us University pages, I thought I’d try and tackle some more practical problems.
Scrollview
When making mobile applications, the scrollview is ubiquitous. This is a UI widget that shows up everywhere and has so many uses. Luckily Famo.us has a an example in their Starter Kit. Download it from their home page.
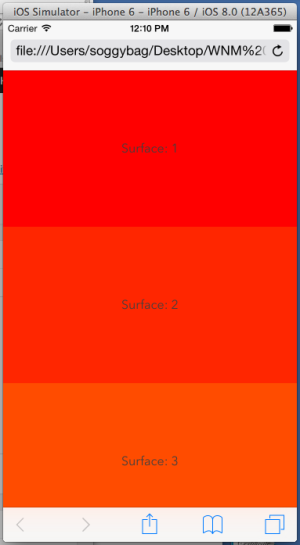
The scrollview example is located in reference-examples/views/scrollview.
Take a look at the example itself. The code looks pretty simple, if you’ve gone through the University Tutorials, you should recognize many of the features. Open the example in a browser and test it. Just a set of colored rows with a single line of text. The scrollview doesn’t scroll with a click and drag. It does scroll with a swipe on the track pad. This doesn’t look like it’s doing anything, or is it? Try it in the iOS simulator, or on your mobile device. Here it scrolls with a swipe as expected.
Take a look at the files in the example folder. There are really two files:
- index.html
- src/main.js
Looking at index.html you will see that there is not a whole lot there. There are a few links to js files, that are commented as “Shims for backwards compatibility.” I’ll guess these are not necessary for modern browsers. Then there is a section commented as “famous.” I’ll take a guess that this is the main famous stuff. This section has two style sheets and two js scripts. The first script loads famous from the famous CDN. While the second script loads “src/main.js”, which is the example js.
Take a look at main.js. Overall this is pretty short. The code is wrapped in a define() block. The function passed to define must be called when the rest of the famous and the DOM is loaded. Here require() is used to load modules of the famous code base.
- Engine
- Surface
- Scrollview
After the requires, a context is created, mainContext. The context is the container that renders surfaces.
Next is a new Scrollview object is created.
Then a an empty array, surfaces, is defined. The array is passed to the scrollview object via sequenceFrom().
A note on scrollviews. In general these are set up to display items from a list, or array. The scrollview only displays the rows that are currently visible. If you have a list containing thousands of items, I imagine your iTunes library has thousands of items, your mobile computer does not have enough memory to display all of these as one giant list. Instead the the computer displays only the rows that are currently visible on the screen. I’m guessing Famous is using the same strategy. Hence it needs a list of surfaces to display. The scrollview will mange displaying these surfaces.
Next there is a for loop that builds surfaces and adds them to the surfaces array. Each surface is created with newSurface(). The content of a surface will be the text: “Surface: #”, where # is the number of the surface. The width is undefined, I’ll guess this allows the surface to be any width, and the height is 200 px. Next the surface is assigned properties. The background color, line height, and text align. These are standard CSS properties.
Each new surface was created in a local variable named temp. Next we’re calling the pipe() method and passing a reference to the scrollview. I’m not sure what this doing, I’ll have to revisit the Famous University.
Next push each new surface into the surfaces array.
Last, add the scrollview to the mainContext with add().
What next?
The best way to understand how these things work, and to develop ideas as to how you can use them for your own projects is to experiment! The best way to test these things is to start small. Making small changes and testing to observe the results.
As a start lets work with the content. Line 52 shows:
content: "Surface: " + (i + 1),
This seems to be the content of each row in the scrollview. Let’s play with this and test that assumption. Change the content, try making these changes:
- Change the text
- Add HTML tags to format the text
Next change the size of the rows. As is each row 200 px tall, note that the content has a line height 200 px which places the text in the vertical center, and also makes the text take up the whole height of the row.
Change the line height to something more smaller. Add a second line of content to each row.
Try out these properties:
- fontFamily, fontSize, color
- border, borderTop
Customize row content
The tableview is not very useful if you can’t customize the content of each row. In the example, rows are generated within a loop, and the only real content is the row number.
Make an array to mock up some more relevant content. The demo uses a loop:
for (var i = 0, temp; i < 40; i++) {
    ...
}
Try replacing this with an array. Define an array and then loop through the array:
var array = ["A", "B", "C", "D"]; // add a lot more, do the whole alphabet
for (var i = 0; i < array.length; i++) {
    ...
}
With this you should see the same rows, but only as many rows as you have elements in the array. Now display the content from the array. Find where the content property is set for the surface. Try this:
...
content: "Surface: " + array[i] + " " + (i + 1),
...
At this point you should see something like: “Surface: A 0” for each row. You can use HTML and CSS in here also. Imagine this:
...
content: "<strong>Surface: " + array[i] + "</strong> " + (i + 1),
...
Add a class name. You’ll need to style this class in your style sheet.
...
content: "<strong><span class='title'>Surface:</span> <span class='content'>" + array[i] + "</span></strong> <span class='count'>" + (i + 1) + "</span>",
...
Watch the quotes carefully. Attribute values must always be in quotes. Since the outer quote is a double “, the inner quotes need to be single ‘.
Adjust the height of the cell.
...
size: [undefined, 100], // Change the height to 100
...
The example adds a few properties like:
 properties: {
     backgroundColor: "hsl(" + (i * 360 / 40) + ", 100%, 50%)",
     lineHeight: "200px",
     textAlign: "center"
 }
These these generate CSS properties that are attached to the row element as inline styles. Prove this to yourself. Use the inspector to view one of the scrollview cell rows. You should see something like:
<div class="famous-surface" style="line-height: 200px; text-align: center; opacity: 0.999999; -webkit-transform-origin: 0% 0%; -webkit-transform: matrix3d(1, 0, 0, 0, 0, 1, 0, 0, 0, 0, 1, 0, 0, 200, 0, 1); width: 400px; height: 200px; background-color: rgb(255, 38, 0);">Surface: 2</div>
This shows each row is displayed from a div with a famous class, and some style properties. Some of the properties are applied by famous, while others were added by us when the surface was created.
I think it’s probably better to move our styles to a style sheet. At this point it’s hard to say if this is best practice for Famous. In any regular HTML page it would definitely be best practice.
Note that the color value is generated for each row, the value is based on the row number. It’s this system that gives us the great rainbow effect. For styles that need to be generated on the fly based on data only available when the surface element is created, setting the properties here is a good idea. For general properties, I’m guessing it will better to use a style sheet.
Logo as ing or h1
I get this question a lot, here are a few thoughts.
Think about it this way, the alt attribute might tell you what it is if it’s worded well. Bu, even if it is worded well, is it what the page is about? We don’t know. We can’t be sure because the alt is just a description of the the image. The h1 on the other hand is very clearly a very important heading. This is very clear.
Consider a page with these two images:
img alt=”cat”
img alt=”Pepsi”
Is the page about cats or is it about pepsi? You can’t tell. The page might be about Pepsi with a picture of a cat enjoying the pepsi, imagine it’s part of Pepsi’s new ad campaign that takes advantage of the internet’s love of cats.
Or, in an alternate universe, imagine that the page is a cat fancier blog, with a picture their cat named Pepsi. It could happen, Pepsi is a cute name, they already have another cat named Moxi.
Now consider this markup.
h1 Pepsi /h1
img alt cat
The h1 tag clearly says this page is about Pepsi, whether it’s the cat or the drink might have to be determined by meta data. There is no mistaking that Pepsi is more important than cat. Pepsi is a very important heading, while cat is merely an alternate text description of the image.
Using this markup, we’re also clearly describing the content and presentation. Pepsi is the name of the site so we use text. Cat is a picture on the page, presumably a picture of a cat, the computer can’t be sure the picture is actually a Cat, or the logo of a multinational corporation. Consider that in the context of the first example for a moment. Catapillar tractor abbreviates their name as Cat. It’s printed on everything this. I seeing even more room for confusion in the first example.
Using this arrangement we also get the advantage of displaying the logo as text, or as any range of alternate images, based on media queries. The look of the h1 is fully handled by our stylesheet. Mulitnational corporations like to have their logos appear in very specific ways depending on context.
Overly clever readers are thinking, what about this:
img alt=”Cat, the Catapillar company logo”
img alt=”Pepsi our peppy new skid steer loader”
While this is more descriptive it requires a fairly intelligent system to examine the alt text and come up with a meaning. While the Google algorithms are pretty smart, I still feel there’s room for error. And all of the non Google algorithms fail.
CSS Sprites
Using spritesheets with HTML is getting popular. The advantage is only having to load a single image file, rather than a separate image for each image element.
Here’s a link to an online tool that will make spritesheets and give you the coordinate data in CSS.
http://www.spritecow.com/
CSS- Sprites
Here’s a great explanation of CSS sprites.
Games in HTML5?
Not only does this answer the question posed in the title, the article gives a great overview of all of the technologies that are involved.
Browser developer tools
Here’s an article on all of the ins and out of using the browser developer tools. If you want to make web sites this information will only make it easier!
What's ePub?
The ePub format is a popular and well supported format for creating electronic publications. This is a great format to get your work on to the iPad and iPhone and most other mobile devices.
How does it work?
The system is based on XHTML and XML. Without getting into the technical details let’s just say it’s similar to creating a web page.
To create an ePub file you’ll need all of the tools you might use to create a web page, an HTML editor or plain text editor. You’ll also need something to convert your final book into a zip file.
ePub files are organized in a folder named for the book. This folder contains a few other files and folders.
A folder named META-INF, which contains files describing your book and it’s content.
A file named mimetype which defines the file type as an epub file.
The OEBPS folder, which contains all of the content of your book. This folder will contain all of the HTML pages and images that will make up the actual book. This folder also contains a CSS style sheet file to format and style your book. Two last files stored in the OEBPS folder are the content.opf and toc.ncx files. These are plain text file containing XML. The content.opf contains a list of all of the content in your book. This lists all of the HTML, CSS and image files used in the book content. For each item it lists the file path of the source file and the files type and assigns each a an id. The toc.ncx file defines a table of contents for the book. This file lists all of the content and assigns each a navPoint and playOrder. These define the order the pages are displayed in the book. Think of this as linking all of the pages together in order.
Package and compress
Once all of the HTML files and other files are completed your ePub file needs to be packages and compressed. On the Mac you can use the ePub Zip. Just drag and drop the folder containing your book on to ePub Zip.
Reading ePub books
There are several reads for ePub books. On the iPad/iPhone you can use iBooks. On your desktop you can use Adobe Editions.
Sadly the Kindle doesn’t support ePub, though there seems to be a few work a rounds that allow the Kindle read ePub.
More information
Here’s a tutorial on creating a photo book in the epub format: http://next.blurb.com/2011/02/17/how-to-make-an-ipad-photo-book/