CSS Sprites

Using spritesheets with HTML is getting popular. The advantage is only having to load a single image file, rather than a separate image for each image element.

Here’s a link to an online tool that will make spritesheets and give you the coordinate data in CSS.

http://www.spritecow.com/

Ceramic Tile Engine and Tiled

Tiled is a desktop application that helps create tile maps from sprite sheets. Ceramic Tile Engine is a library for use with Corona that displays the data from Tiled. Two great tools that work great together. The demo provided with Ceramic has a really nice platform game example.

Tile maps are larger images created from smaller tiles. By using, and reusing, small tiles large environments can be created. Since a single image containing a few small tiles takes up much less memory than the image created with the tiles tile maps are more efficient.

Tiled is an application you can use to create tile maps. Tiled is generic and not tied to any other application or programming language. You’ll use it to build maps and export a text file describing your map. Usually this will be in the Json format.

Here are a few links:

Discussion on the Corona SDK forum

Ceramic documentation on GitHub

Ceramic Tiled Engine on Github

Video demo using Corona SDK and Tiled together

Corona – Zwoptex – Sprite Sheets

Zwoptex is a tool for creating sprite sheets. Simple and easy to use. Just drag or import your images. Clicking the layout button arranges your images. Click Publish to the publish a Sprite Sheet image and coordinate data. Zwoptex exports data for several platforms.

A few tips. At the time of writing this, Zwoptex output coordinate date for the older Sprite Sheet format used by Corona. Not the newer Image Sheet format, which is much improved. Luckily this is easily remedied.

Be sure to set the Click Publish Settings and save your Zwoptext file before Publishing. You’ll need to set the file dimensions before exporting also. The sizes listed are multiples of 4 just pick the size that best fits.

Use this code example to create Module containing Image Sheet options you can import.
http://forums.coronalabs.com/topic/23624-adjustment-for-new-sprite-apis-spritesheet-object/

Both of these work differently the end result is the same. They both export your sprite data in the newer Image Sheet format. The first will create the code needed that you can copy and paste. The second creates a module you can require into a project.

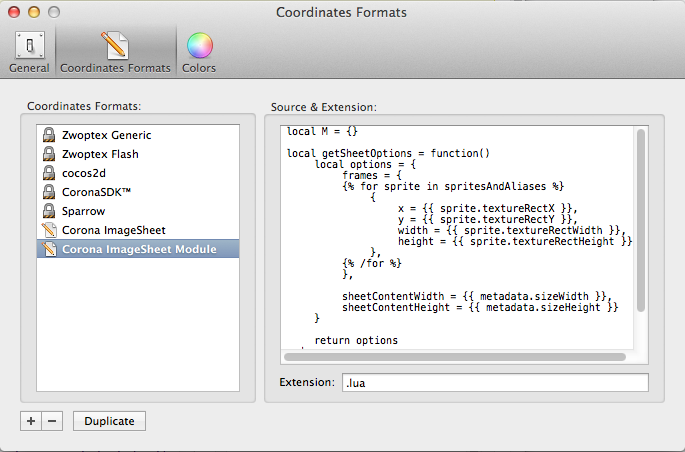
There isn’t any reason why you can’t use both of these! Create a new Coordinate Format in Zwoptex > Preferences > Coordinates Format tab. Click the + button at the bottom left. Give you format a name and paste one of the code snippets from the links above. Set the Extension to .lua below the Source Extension. Repeat the process for the second code block and you can choose one or the other depending on your needs.

Screen Shot 2013-09-30 at 4.38.29 PM

Corona – Sprites Simple Game

Here’s an example that builds off the last post about creating an explosion sprite. In this example we’ll create some alien sprites that move down the screen. When touched these aliens explode.

The explosion sprite sheet and code was taken from this post: Corona – Sprite Explosion.

For this example I used this sprite sheet for the alien: 

Continue reading Corona – Sprites Simple Game

Corona – Sprite Explosions

Sprites

Often you’ll want to create an animated object on the screen, have it play through an animated sequence then remove itself from the screen. In this example I’ll created an animated explosion. The explosion appears when you tap the screen, then removes itself once the sequence of frames is complete.

Sprite Sheet

Creating the sprite sheet. I used the explosion generator here: http://www.nuvorm.nl/?p=1. You’ll need to have the Flash player installed to use this. It generates a sequence of frames in a wide image. The iPhone 3 does not support images larger than 1024 and the 4 supports maximum dimensions of 2048. The explosion image generated from nuvorm.nl was 3999px wide. I had to take this into Photoshop and arrange the image into multiple rows.

I calculated the size of each frame by counting the frames and dividing by the width. Turns out I had 43 frames. This meant each frame 93 px wide. The original image was 100 pixels tall. I sized the image 400 px tall. Then I moved the rows of 10 frames to create a new image 10 frames wide by 4 frames tall. When I was done I had created the image below:

Note the last few frames didn’t have much in them so I dropped the last three frames and made the sequence 40 frames long.

Continue reading Corona – Sprite Explosions

Corona – Animation

Corona Animation Overview

Animation can be looked at in two different categories: Object animation and Frame animation.

Object animation would be defined as moving objects on the screen by setting the x, y or other properties. Frame based animation would be animation created by cycling through a series of images.

These two types of animation can be used together. For the first part of this discussion we will look at each separately.

Continue reading Corona – Animation