People in SF interested in making mobile apps with the Corona SDK should make an effort to attend Building a Candy Crush Style Mobile Game in Under 1 Hour
Category: Corona
Corona – newText positioning
Corona has great graphic handling. Making pictures and moving them on the screen is easy to and works great. When it comes to text there is a little frustration.
The API for display.newText() is:
display.newText( text, left, top, font, fontSize )
So that second and third parameter positions your text from the left and top edges. When you position with the x and y of the text object itself, you are positioning the object from the reference point which is in the center.
local myText = display.newText( "Hello World", 10, 10, "Helvetica", 24 )
The example above would place the text “Hello World” so that the upper left corner of the H would be 10 pixels right of the left edge of the screen, and 10 pixels below the top edge of the screen.
Since the reference point is in the center you can’t be sure what the x and y would be, you would have to know the width.
If you next set the x and y, as in:
myText.x = 100
myText.y = 20
You would know that that the center of the text would be at exactly 100 x and 20 y. Of course how far the left edge of the text was from the left edge of the screen would be hard to figure.
The biggest problem with with handling text in Corona, is that the reference point is reset to center when the text is redrawn. For example:
myText.text = "What!"
The text displayed is shorter and Corona reset the reference point to the center. On the screen this would look like the text were center aligned. The left and right edges would move in toward the center.
If the text is in the center there is no problem. If you have text that needs to align on the left or right, you’ll need to set the reference point and position the text anytime you change the text string it displays.
For example if you wanted to position text aligned 10 from the left edge. You could create your text field with:
local myText = display.newText( "0", 10, 10, "Helvetica", 24 )
If the text changes, imagine you have a game and this text field shows the score.
myText.text = 500
To keep the left edge 10 pixels from the left of the screen, set the reference point to the left side and then set the x position to 10.
myText:setReferencePoint( display.TopLeftReferencePoint )
myText.x = 10
Corona – Zwoptex – Sprite Sheets
Zwoptex is a tool for creating sprite sheets. Simple and easy to use. Just drag or import your images. Clicking the layout button arranges your images. Click Publish to the publish a Sprite Sheet image and coordinate data. Zwoptex exports data for several platforms.
A few tips. At the time of writing this, Zwoptex output coordinate date for the older Sprite Sheet format used by Corona. Not the newer Image Sheet format, which is much improved. Luckily this is easily remedied.
Be sure to set the Click Publish Settings and save your Zwoptext file before Publishing. You’ll need to set the file dimensions before exporting also. The sizes listed are multiples of 4 just pick the size that best fits.
Use this code example to create Module containing Image Sheet options you can import.
http://forums.coronalabs.com/topic/23624-adjustment-for-new-sprite-apis-spritesheet-object/
Both of these work differently the end result is the same. They both export your sprite data in the newer Image Sheet format. The first will create the code needed that you can copy and paste. The second creates a module you can require into a project.
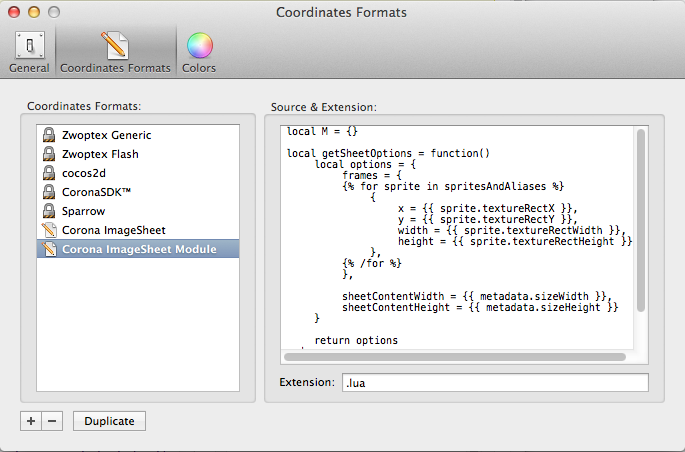
There isn’t any reason why you can’t use both of these! Create a new Coordinate Format in Zwoptex > Preferences > Coordinates Format tab. Click the + button at the bottom left. Give you format a name and paste one of the code snippets from the links above. Set the Extension to .lua below the Source Extension. Repeat the process for the second code block and you can choose one or the other depending on your needs.
Corona – Simple button
The widget button works well for many circumstances. In some cases you will want to use something simpler and more customizable. Here’s is a simple script that shows the basic concepts for creating your own button with a default and active state.
Here the button is a simple rectangle. The default and active state are represented by a simple color change. This could be an image change or any other effect.
-- This function handles animating the button's
-- default and active states.
local function on_touch( event )
	local phase = event.phase	-- Get the event phase
	local button = event.target	-- Get the event target

	-- Check the phase of the event
	if phase == "began" then
		-- When the event begins give button focus, and color red
		display.getCurrentStage():setFocus( button )
		button:setFillColor( 255, 0, 0 )
	elseif phase == "ended" or phase == "cenceled" then
		-- When event ends release focus, and color white
		display.getCurrentStage():setFocus( nil )
		button:setFillColor( 255, 255, 255 )
	end
end

local function do_something()
	print( "The button did something!" )
end

local button = display.newRect( 0, 0, 48, 48 )
button.x = display.contentCenterX
button.y = display.contentCenterY

button:addEventListener( "touch", on_touch )
button:addEventListener( "tap", do_something )
Corona – Triple Town style Matching Game score part 4
I like the idea of animating the combing of tiles. This shows the effect of game play graphically. In some situations a play will combine three tiles setting up a situation where three more tiles can be combined. This is covered in the recursive system from the last post. The game covers this but game play is greatly enhanced if the player can see some graphical representation of what is happening. The same applied to scoring points or other in game effects.
Graphically animating the cause an effect for things that could normally be invisible on the computer enhance the experience of using your apps. This is an important part of creating good user experience. Think of the animation as a little story telling a player about the points they just earned or the new power up they just received or anything that might have happened.
A good example of this can be applied to the tile matching. In the game placing a third tile combines the three tiles into the next color of tile. When this third tile appears it might appear next to another two tiles of the same color. At this point the we have another match and the computer needs to combine them again, and so on.
We have this covered. But the action applies in a single step, no matter how many tiles have been combined. In this system it is not exactly clear what has happened. Better would be to show each step animated sequentially. For example, show red tiles combining into a green, followed by three green tiles combining into a blue tile.
Animating combining tiles
Since the system described in the last post uses a recursive function call, creating this effect is easy to achieve. We only need to delay recursive call to check_tile_match(tile) the time of the animated transition.
Inside the check_tile_match(tile) function, there is a call to check_tile_match(tile). Instead of calling this directly, wrap it in a timer.perfromWithDelay(). check_tile_match(tile) requires that you include the tile you are looking for. Since this variable is local to the function we’ll to use a closure.
timer.performWithDelay( 500, function() check_tile_match( tile ) end, 1 )
Here I’ve added a function as the handler for timer.performWithDelay(). This function wraps, or encloses, check_tile_match(tile), effectively preserving the value of tile.
Adding some animated score
As long as we’re on the subject of providing information about game state and game actions, we should also provide some score information. The game currently does not have a score, then I’ll add a an animated point value that appears at the location where points are scored.
Adding the Score
Score is a big topic games. How many points should a play be worth? Great question that points to how your game progresses and how players will view escalation and game play. Rather than concentrating on the points scored I want to focus on how the score is displayed here.
The most common place to see the score is the upper left corner of the score. We’ll use that in this example. I first hid the status bar to make room for the score.
display.setStatusBar( display.HiddenStatusBar )
Create a variable to hold the actual score value.
local score = 0 -- Add a variable to hold the score
Next, create a text object to display the score.
-- Add a text object to display the score
local score_text = display.newText( score, 0, 0, native.systemFont, 16 )
Due to the way that Corona handles text we will need to set the reference point and set the position of the text object each time we change the text it displays. I created a function to handle this.
This function receives a parameter equal to the number of points just scored. It adds these to score, sets the get in the score_text to the updated value then sets the reference point. I want the text to align with the upper right corner. Normally text objects are aligned with a center reference point. After changing the text of the object I need to set the reference point with object:setReferencePoint() and then set the x and y.
When the project loads, the last line below, calls this function once. This sets the initial position of the text field.
-- A function to update the score
local function set_score( points )
	score = score + points 	-- Add points to score
	score_text.text = score	-- Display the new score
	-- These next three lines position the score based on the top left reference point
	score_text:setReferencePoint( display.TopLeftReferencePoint )
	score_text.x = 10
	score_text.y = 5
end

set_score( 0 ) -- Call set score once to position the score text correctly
Next set the score when points are scored. Inside check_tile_match(tile) find the line that sets the point score for the last play. Right after this call set_score(points) passing the points scored.
-- Calculate points
local points = match_color_index * 100 * #matched_array
set_score( points ) -- Call set_score to add these points to the score
show_points( points, tile.x, tile.y ) -- Display the points at the location of the scoring tile
Show points scored at the point where they are scored with motion
Now we’ll add a text field that shows the points scored. This will show up at the tile that was last played. Then animate up the screen and fade out. This is another good spot for a factory function.
First we need a function to create a text field that will show the point value scored. This will be another factory function that returns a reference to the text object created. All that happens here, is a text field is created, and the text is set to the number of points scored. Then the text field is returned. You pass what to display to this function.
It seems like this function does’t do much. It’s job is to keep us organized. Here the only thing that happens is we make the text object. Any code that would set the color or other features of this text object would go here.
-- Add a function to create score field objects
local function Score_Field( points )
	local score_text = display.newText( points, 0, 0, native.systemFont, 12 )
	return score_text
end
Next we’ll make a factory function that creates the points and animates the text field. We’ll use a transition to animate the text and a function to remove the text when the transition is complete.
-- This function removes score fields
local function remove_score_text( score_text )
	display.remove( score_text )
end

-- this function shows points in a score field on the game board.
local function show_points( points, x, y )
	local score_text = Score_Field( points )
	score_text.x = x
	score_text.y = y

	transition.to( score_text, {y=y-100, time=300, delay=200, alpha=0, onComplete=remove_score_text} )
end
Last call this function from check_tile_match(tile) after the line that calculates the point value.
-- Calculate points
local points = match_color_index * 100 * #matched_array
set_score( points ) -- Call set_score to add these points to the score
show_points( points, tile.x, tile.y ) -- Display the points at the location of the scoring tile
Here’s a full listing the code that I used. This combines the code from the last example with the new code discussed here.
Continue reading Corona – Triple Town style Matching Game score part 4
Corona – Triple Town style Matching Game matches Part 3
Here’s a nice addition to the Triple Town like matching game. Add an animated transition to a match. The effect is that the tiles appear to merge into the final tile.
The effect is created by creating new tiles above the regular game tiles. These new tiles are only temporary. They are placed above the original tiles with the same colors and are animated toward the final tile. The motion uses alpha, so they fade to transparent when the transitions is complete. Each tile removes itself when the transitions are complete using the onComplete property.
The only new code added from the previous example, is a new function: animated_match(). This function makes use of the variables: matched_array, which contains all of the matched tiles, and match_color_index which contains the index of current color that was matched.
local function animated_match()
	local color = color_array[match_color_index]
	local t = {time=500, x=matched_array[1].x, y=matched_array[1].y, alpha=0, onComplete=remove_tile}

	for i = 1, #matched_array, 1 do
		local tile = Tile()
		tile:setFillColor( color.r, color.g, color.b )
		tile.x = matched_array[i].x
		tile.y = matched_array[i].y
		transition.to( tile, t )
	end
end
Here’s a full list of the code for this example:
Continue reading Corona – Triple Town style Matching Game matches Part 3
Corona – Triple Town style Matching Game Logic Part 2
The goal of this post is to create some Triple town style matching logic. Triple town if you haven’t played it is a very addictive matching game. The core concept is that you place elements on the game board. Three adjacent elements combine into a new elements. Elements combine in a progression.
In the last example I posted, I had created a grid with squares that cycled through colors: red, green, blue, yellow, magenta, cyan. This will by our progression. Tapping a square will color that square red. Three red squares will combine to form a green square, three green squares will combine to form a blue square etc.
I’ll be starting with the source code from the last post.
The first step is to retool the touch_tile() function. In the last example each touch advanced a tile through all of the colors in turn. Tapping an empty tile will color it red. Tapping other tiles will not effect.
local function touch_tile( event )
	local phase = event.phase

	if phase == "ended" then
		local tile = event.target
		if tile.is_empty then
			tile.is_empty = false
			tile.color_index = 1

			local r = color_array[ tile.color_index ].r
			local g = color_array[ tile.color_index ].g
			local b = color_array[ tile.color_index ].b

			tile:setFillColor( r, g, b )
		end

		-- Matching logic logic starts here.
		check_tile_match( tile )
	end
end
When looking for matching tiles we might find any number of tiles that match. Define an array to hold the matched tiles. As we search for matching, and adjacent tiles, add them to this new array. When the search is complete examine the array to see how many matches there are.
The color_index property assigned to each represents the color displayed by the tile. This is what we will match. If two tiles have the same color_index they should display the same color. Create a variable to hold the match index while we search for a match.
local matched_array = {} -- An array to hold matched tiles
local match_color_index = 0 -- Match this color index
Searching adjacent tiles
To search for adjacent tiles we need to look at tiles that to the left, top, right and bottom of the current tile. Tiles are stored in tile_arrays. This is organized into arrays for containing tiles for each row. For example you could access the third tile in the second row with tile_array[2][3]. Think about about it this way: tile_array[row][column].
Imagine starting at tile_array[2][3]. To look at the four tiles surrounding this tile you’d need to get tiles:
- tile_array[2][2] — left
- tile_array[1][3] — top
- tile_array[2][4] — right
- tile_array[3][3] — bottom
You could think of this as:
- tile_array[2][3-1] — left
- tile_array[2-1][3] — top
- tile_array[2][3+1] — right
- tile_array[2+1][3] — bottom
Think about the surrounding adjacent tiles as coordinates specified in rows and columns:
- 0, -1 — left
- -1, 0 — top
- 0, +1 — right
- +1, 0 — bottom
After checking each of the adjacent tiles, if there is a match we can begin the search again from that tile. With each match we add that tile to the matched_array.
When checking tiles at the edge of the board some results will fall outside of the array. We’ll need to check for this.
Here’s a rough sketch of the code that will run the matching system:
local function check_neighbors( tile )
    -- look at adjacent tiles
    -- add a match to matched_array
    -- for each matched tile call check_neighbors( matching_tile )
end
This is called recession. Essentially the function above calls on itself. In Lua you’ll need to use a forward declaration or the function will not be able to “see itself”, and think it has not been declared.
local check_neighbors -- forward declaration
function check_neighbors( tile )
    -- ... code ...
    check_neighbors( matching_tile )
end
We also need some code to start the matching process and look at the results of the match check. Here’s the rough code
local check_neighbors -- Forward decalraitons
local check_tile_match

local function get_tile_frame_at_col_row( col, row )
    -- that tile at col, row is inside of the array

end

function check_neighbors( tile )
    -- Check adjacent tiles for a match
    check_neighbors( matched_tile )
end

function check_tile_match( tile )
    -- Find all matching adjacent tiles
    check_neighbors( tile ) -- Call recursive function to find all tiles
    -- look at the match results and set the colors of tiles accordingly
end

local function touch_tile( event )
    check_tile_match( tile ) -- Call check_tile_match() with event.target
end
Here’s a full listing of the code:
-----------------------------------------------------------------------------------------
--
-- main.lua
--
-----------------------------------------------------------------------------------------

-- Your code here

local TILE_ROWS = 6
local TILE_COLS = 6
local TILE_SIZE = 50
local TILE_MARGIN = 1

local match_color_index = 0

local tile_array = {}
local color_array = {}
local matched_array = {} -- An array to hold matched tiles

local game_group = display.newGroup()


local function Color( red, green, blue )
	return {r=red, g=green, b=blue}
end

table.insert( color_array, Color(255, 0, 0) )
table.insert( color_array, Color(0, 255, 0) )
table.insert( color_array, Color(0, 0, 255) )

table.insert( color_array, Color(255, 255, 0) )
table.insert( color_array, Color(255, 0, 255) )
table.insert( color_array, Color(0, 255, 255) )

local check_neighbors
local check_tile_match

local function get_tile_frame_at_col_row( col, row )
	if col >= 1 and col <= TILE_COLS and row >= 1 and row <= TILE_ROWS then
		return tile_array[row][col]
	else
		return false
	end
end

function check_neighbors( tile )
	-- Get the row and col of this tile
	local row = tile.row
	local col = tile.col

	-- Define the coords of Left, Top, Right, and Bottom
	local ltrb_array = { {row=0,  col=-1},
						{ row=-1, col=0 },
						{ row=0,  col=1 },
						{ row=1,  col=0 } }

	-- print("Check from tile:".. tile.row .. tile.col .. " " .. tile.alien.currentFrame  )

	-- Loop through left, top, right and bottom
	for i = 1, #ltrb_array, 1 do
		local check_row = row + ltrb_array[i].row
		local check_col = col + ltrb_array[i].col
		-- Check that the row and col are on the board
		local n_tile = get_tile_frame_at_col_row( check_col, check_row )

		if n_tile then -- on board
			if n_tile.color_index == match_color_index then -- matches
				-- Check that this tile doesn't exist in matched_array
				local index = table.indexOf( matched_array, n_tile )

				if index == nil then -- tile hasn't been found yet!
					print( "match at:" .. n_tile.row .. n_tile.col )
					table.insert( matched_array, n_tile ) -- add to array
					check_neighbors( n_tile )	-- recur this function with new tile
				end
			end
		end
	end
end

function check_tile_match( tile )
	matched_array = {tile}					-- Add the first tile to the array
	match_color_index = tile.color_index	-- Get the index to match

	check_neighbors( tile ) -- Start looking for matching tiles

	-- Time to clear the tiles, if there are more than 2 matches
	if #matched_array > 2 then 				-- If more than two tiles match
		for i = 2, #matched_array, 1 do 	-- Loop through all but the first tile
			local tile = matched_array[i]	-- Clear all these tiles
			tile.color_index = 0
			tile.is_empty = true
			tile:setFillColor( 255, 255, 255, 100 )
		end

		local tile = matched_array[1]				-- Get the first tile and
		local color_index = match_color_index + 1	-- advance it's color
		local color = color_array[ color_index ]
		tile.color_index = color_index
		tile:setFillColor( color.r, color.g, color.b )
		tile.is_empty = false

		check_tile_match( tile )
	end
end
----------------------------------------------------------------------------------------


local function touch_tile( event )
	local phase = event.phase

	if phase == "ended" then
		local tile = event.target
		if tile.is_empty then
			tile.is_empty = false
			tile.color_index = 1

			local r = color_array[ tile.color_index ].r
			local g = color_array[ tile.color_index ].g
			local b = color_array[ tile.color_index ].b

			tile:setFillColor( r, g, b )
		end
		-- Matching logic logic starts here.
		check_tile_match( tile )
	end
end


local function Tile()
	local tile = display.newRect( 0, 0, TILE_SIZE, TILE_SIZE )
	tile:setFillColor( 255, 255, 255, 100 )
	return tile
end


local function make_grid()
	local tile_spacing = TILE_SIZE + TILE_MARGIN
	local offset_x = ( display.contentWidth - ( tile_spacing * TILE_COLS ) ) / 2
	offset_x = TILE_SIZE / 2 - offset_x

	for row = 1, TILE_ROWS, 1 do
		local row_array = {}
		for col = 1, TILE_COLS, 1 do
			local tile = Tile()
			game_group:insert( tile )
			tile.x = ( col * tile_spacing ) - offset_x
			tile.y = row * tile_spacing
			tile.row = row
			tile.col = col

			tile.is_empty = true -- set this tile to empty
			tile.color_index = 0

			tile:addEventListener( "touch", touch_tile )
			table.insert( row_array, tile )
		end
		table.insert( tile_array, row_array )
	end
end

make_grid()
Corona – Triple Town style Matching Game Part 1
Someone recently pointed out the game Triple Town for IOS. This is a really great little time waster. Game play is fun and challenging. It’s more of a board game rather than a real time game. You can play online also, they have a Flash version: http://www.tripletown.com/
The game is played on a grid, and the basic mechanic is to match three adjacent items. Matching three items of one type replaces the last item placed with a new item and removes the others. Matching three items leave you with a new advanced item. For example starting with two Grass, adding a third Grass combines all grass into a Bush. Three Bushes combine into a Tree, three trees combine into a House etc. here’s a chart:

This mechanic of combining three items and trading them up is very interesting. The game has a few other elements that add more options to game play.
I haven’t yet been able to get up to the sky tower or sky castle. I can make it up past 100K in points, then the Ninja Bears, yes Ninja Bears, cause so much trouble and I get stuck. You’ll have to play the original game if you want to meet the Ninja Bears.
The idea of finding trios of matching elements on a grid made for an interesting problem to solve. It took a few tries to get right. The solution I came up with was to look at the grid square where you placed a new “piece” and examine all of the adjacent squares for a match. From here you’ll need to recursively examine all of the matching squares for another match.
Recursion is the idea of having the same block of code execute itself. In my case I had a function that looked at a grid square, then examined the adjacent grid squares for matches. In this adjacent means top, left, right, and bottom, not diagonal. In other words starting a at grid square, look for matches in the adjacent squares, then use the same function to find other matching squares in the adjacent matches.
Try it for yourself
I started a new Corona project. I used the basic project so i started with only the main.lua, config.lua, build.settings file. To keep things simple I will stick with the built in shape objects and avoid images for now. By avoiding images and sprites I can concentrate on functionality without getting hung up with non related issues.
Creating a grid
The first step is to create a grid. The grid will be made up of squares, equal height and width. Each grid square will be a rectangle shape. The first step is to define some variables describing the grid.
local TILE_ROWS = 6
local TILE_COLS = 6
local TILE_SIZE = 50
local TILE_MARGIN = 1
These variables define the number of rows and columns in the grid. Rows run horizontal while columns run vertical. The grid will be 6 by 6. Since the tiles will be square, I used single variable to set the size. The margin is the space between tiles.
Making these variables uppercase is a convention to denote that they are constants. Constants are values that do not change, they are essentially fixed while the program runs. Lua doesn’t support true constants, the uppercase is a just a reminder.
With these variables in place at the top of our script we can change the values here to modify the grid arrangement. This is much easier, and more flexible than having the dig around in code to change things.
We will want to store all a reference to each of the tiles. For this I will use an array. For this I will define an array named: tile_array. I use the extension _array as a convention. This is not required but makes a good reminder this variable contains an array. The name also implies the array contains tiles.
All of the game elements should probably be contained in a group. This will allow use to move, scale, and rotate all of the game elements together. Here again I used an extension to remind myself that this element contains a group.
local tile_array = {}

local game_group = display.newGroup()
Tile factory
To keep my code in organized blocks I like to use factory functions to create elements. In this case I need tiles so I’m going to make a function that creates tiles, and initialize them, then returns a reference to the new tile.
local function Tile()
	local tile = display.newRect( 0, 0, TILE_SIZE, TILE_SIZE )
	tile:setFillColor( 255, 255, 255, 100 )
	return tile
end
This simple function creates a new rectangle of TILE_SIZE width and height. Sets the color to a transparent white. Then returns the tile. Any other standard tile features would be added here.
Make a grid of tiles
Now that I have all of the preliminary work in place I can make the grid. The function below contains two loops. The outer loop, loops once for each row. The inner loop, loops once for each column. Imagine starting in the upper left and creating TILE_COLS number of tile squares from left to right, then moving down one row and making all of the tiles left to right, continuing this process for TILE_ROWS.
local function make_grid()
	local tile_spacing = TILE_SIZE + TILE_MARGIN
	local offset_x = ( display.contentWidth - ( tile_spacing * TILE_COLS ) ) / 2
	offset_x = TILE_SIZE / 2 - offset_x

	print( display.contentWidth, tile_spacing * TILE_COLS, offset_x )

	for row = 1, TILE_ROWS, 1 do
		for col = 1, TILE_COLS, 1 do
			local tile = Tile()
			game_group:insert( tile )
			tile.x = ( col * tile_spacing ) - offset_x
			tile.y = row * tile_spacing
		end
	end
end
Positioning the tiles
The function above include some funny math at the top and a bit math in the middle to position the tiles. At the top I declared two local variables. Tiles spacing sets the space between each tile. This is the size of the tile plus the margin between tiles. Look inside the loop and you’ll see the x and y position of the tile is set to tile_spacing times row and col.
Tiles are positioned off their center point, and the first number we are count from is 1. I used offset_x to center the tiles inside the group. First I found the left over space by subtracting the total width of tiles from the width of the screen, then dividing by two. imagine the left over space is split on each side. Last I need to offset half the width of a tile, side the tiles are positioned on their center.
Also note that all tiles are added to the game_group.
Adding tiles to the array
The tiles need to be added to the tile_array. The array can act as a two dimensional storage space. Which may more accurately describe our tile grid. To do this we’ll use an array to store each row and store these row arrays in the tile_array.
local function make_grid()
	local tile_spacing = TILE_SIZE + TILE_MARGIN
	local offset_x = ( display.contentWidth - ( tile_spacing * TILE_COLS ) ) / 2
	offset_x = TILE_SIZE / 2 - offset_x

	for row = 1, TILE_ROWS, 1 do
		local row_array = {}
		for col = 1, TILE_COLS, 1 do
			local tile = Tile()
			game_group:insert( tile )
			tile.x = ( col * tile_spacing ) - offset_x
			tile.y = row * tile_spacing

			tile.row = row
			tile.col = col

			table.insert( row_array, tile )
		end
		table.insert( tile_array, row_array )
	end
end
In this arrangement we will be able to access any tile with a row and col value. For example, the following would access the tile in the third row second column:
tile_array[2][3]
Also notice that I assigned each tile a row and col property. This way each tile will know it’s position in the grid. This will be important later one. Tapping a tile we can ask that tile it’s row and column.
Tapping the Grid
For this I’ll add a touch event to each tile. All of the touches can be handled from the same function since all tiles will know their row and col.
I’m using touch rather than tap as it provides more options.
For testing the touch function will print out the tiles row and column.
local function touch_tile( event )
	local phase = event.phase

	if phase == "ended" then
		local tile = event.target
		print( tile.row, tile.col )
	end
end
Using “ended” here creates an interaction that occurs after your finger lefts off the screen. I feel this might out, since if you were to touch down on the wrong tile you could drag your finger to the correct tile before the event was registered.
Register the event listener in make_grid().
local function make_grid()
	local tile_spacing = TILE_SIZE + TILE_MARGIN
	local offset_x = ( display.contentWidth - ( tile_spacing * TILE_COLS ) ) / 2
	offset_x = TILE_SIZE / 2 - offset_x

	for row = 1, TILE_ROWS, 1 do
		local row_array = {}
		for col = 1, TILE_COLS, 1 do
			local tile = Tile()
			game_group:insert( tile )
			tile.x = ( col * tile_spacing ) - offset_x
			tile.y = row * tile_spacing

			tile.row = row
			tile.col = col

			tile:addEventListener( "touch", touch_tile )

			table.insert( row_array, tile )
		end
		table.insert( tile_array, row_array )
	end
end
Cycling colors
To keep things simple I’ll stick with shapes. Clicking a tile we need to change it in some way. For now I’ll just set the color. Colors are made up of red, green and blue values. It’s a good idea to keep them in a table. To this end a factory function would work well.
-- Make a function to return a color
local function Color( red, green, blue )
	return {r=red, g=green, b=blue}
end
In OOP languages constructors begin with an uppercase letter. I’ll follow this convention here. This is a simple function that takes three values, and returns a table containing three values r, g, and b.
Now let’s make some colors. The game will need to cycle through a series of colors in order. An array is needed to keep these organized.
local color_array = {} -- An array to store colors
Then make some colors and add them to the array.
table.insert( color_array, Color(255, 0, 0) )
table.insert( color_array, Color(0, 255, 0) )
table.insert( color_array, Color(0, 0, 255) )

table.insert( color_array, Color(255, 255, 0) )
table.insert( color_array, Color(255, 0, 255) )
table.insert( color_array, Color(0, 255, 255) )
Now tap to cycle through colors. When the game begins tiles will be empty. Tiles will take on a color when they are tapped. This means that a tile will need to keep track of it’s color. A couple variables are needed. Add a pair of property variables to each tile in make_grid().
tile.is_empty = true -- set this tile to empty
tile.color_index = 0
Now modify touch_tile() to handle the color change.
local function touch_tile( event )
	local phase = event.phase

	if phase == "ended" then
		local tile = event.target
		if tile.is_empty then
			tile.is_empty = false
			tile.color_index = 1
		else
			tile.color_index = tile.color_index + 1
		end

		local r = color_array[ tile.color_index ].r
		local g = color_array[ tile.color_index ].g
		local b = color_array[ tile.color_index ].b

		tile:setFillColor( r, g, b )
	end
end
This post has set a basic tile board with some interactivity. The next post will apply some Triple Town style matching logic.
Below is a complete copy of the source code from this example.
Continue reading Corona – Triple Town style Matching Game Part 1
Corona – Tower Defense Game Experiments 14
Here’s a few thoughts on setting up waves of enemies. Plants vs Zombies makes waves of zombies and puts the waves to good use. Game play gets much more exciting after the message “A huge wave of Zombies is approaching.”
The game requires that you either a starting reserve of energy or you have to start with a fewer enemies. After building your defense for a while it becomes very easy to take on the enemies. This means that a larger wave of enemies is required to make the game more interesting at this point.
There are a lot approaches you could take to creating wave of enemies. I’m going to define a wave of enemies by describing the wave in terms of time between enemies, number of enemies in wave, and pool of enemies.
Time between enemies will be the amount of time between the creation of each new enemy.
Number of enemies in wave, will be the count of total enemies in this wave.
Pool of enemies will be a listing of the types of enemies in the wave. This is the most abstract idea here. I’m going to use the pool as a list of possible enemy types that might appear in the wave. During the wave each new enemy created will be a random type chosen from the pool. The pool will be an array. By adding the same type more than once the pool can weighted.
Each wave will be initiated by a timer.
Use three variables to keep track of the wave. One and array the other an integer setting the index of the current wave in the array. The last variable will keep track of a timer that tracks the wave.
local wave_timer -- add a timer to hold the wave
local alien_wave_index = 1 -- Use this to keep track of the current wave
-- Add an array to hold a wave of enemies
local alien_wave_array = {
							{ time=2300, 		-- Time between enemies
							count=10, 			-- Number of enemies in wave
							pool={1,1,1,2,3}, 	-- Number and type of enemies in wave
							delay=3000
							} ,

							{ time=1500, 		-- Time between enemies
							count=20, 			-- Number of enemies in wave
							pool={1,2,3}, 		-- Number and type of enemies in wave
							delay=2000
							}
						}
The array above holds a list of tables. Each of these tables describes a wave of enemies. Notice each table has properties of time, count, pool, and delay.
- time – sets the time in ms between enemies during wave
- count – total number of enemies in wave
- pool – an array of alien types represented in wave
- delay – time to wait after wave before starting the net wave
I added the extra delay property here as thought it might be useful to control the flow of things.
Next I needed two functions to control the waves of enemies. The make_wave() function sets up timers to run the wave. Here I create two timers. One called make_alien(). This timer takes the time and count from the current wave table. The second timer is set to total length of the current wave and is used to start the next wave.
I need to include a forward declaration here for next_wav, since this function calls make_wave and make wave calls it.
-- Need a forward declaration
local next_wave

-- Add this function to mange creating enemies that attack in waves.
local function make_wave()
	local wave_table = alien_wave_array[ alien_wave_index ]
	local wave_time = wave_table.time
	local wave_count = wave_table.count
	local delay_after_wave = wave_table.delay

	alien_timer = timer.performWithDelay( wave_time, make_alien, wave_count )
	local time_til_next_wave = ( wave_time * wave_count ) + delay_after_wave
	wave_timer = timer.performWithDelay( time_til_next_wave, next_wave, 1 )
end

-- Called at the end of each wave
function next_wave()
	alien_wave_index = alien_wave_index + 1
	if alien_wave_index > #alien_wave_array then
		print( "ALL WAVES COMPLETE" )
	else
		print( "next wave" )
		make_wave()
	end
end

make_wave()
Here’s a full listing of the code in this example:
Continue reading Corona – Tower Defense Game Experiments 14
Corona – Tower Defense Game Experiments 13
This series of posts has been going on for some time. I’m up to 13! I’m not done with the game yet, but it does have some interesting features.
In this post I’d like to add some “explosions”. What I really want is a small animated effect to show that an enemy has been hit by a bullet. For simplicity I’ll stick with the shapes and use a circle for the explosion. This could be replaced in the future.
The strategy here will be the same as was used with everything else, use factory function to create objects, and another function to remove the object when the explosion is finished.
Explosions will be animated with a transition animating the width and height. The onComplete will be used to remove the explosion when the animation finished.
-- Use this function to remove explosions
local function remove_explosion( explosion )
	display.remove( explosion )
end

-- Use this function to make explosions
local function make_explosion( x, y )
	local explosion = display.newCircle( 0, 0, 1 )
	explosion.x = x
	explosion.y = y
	explosion:setFillColor( 0, 0, 255, 66 )
	explosion.strokeWidth = 3
	explosion:setStrokeColor( 0, 0, 255, 128 )
	alien_group:insert( explosion )
	transition.to( explosion, {width=20, height=20, time=500, onComplete=remove_explosion} )
end
Above are the two functions. These are pretty simple. I made the explosions blue to separate them from the enemies (green), and the defenses (red).
The explosion is added to the alien_group. This keeps them inside the game_group, since alien_group is a child of game_group, and should keep new explosions on top of existing enemies.
All that’s need now is to call make_explosion( x, y ) and pass the x and y location where the explosion should occur. Bullets hit enemies in the check_bullets() function.
local function check_bullets()
	for b = 1, #bullet_array, 1 do
		local bullet = bullet_array[b]
		if b > #bullet_array then
			return
		end
		for a = 1, #alien_array, 1 do
			local alien = alien_array[a]
			if hit_test( bullet.x, bullet.y, alien.contentBounds ) then
				if alien.life > 0 then
					make_explosion( alien.x, alien.y ) -- Add an explosion on a hit
					alien.life = alien.life - bullet.damage
					local defense_name = bullet.defense_name

					if defense_name == "Stun" then
						transition.cancel( alien.transition )
						local t = ( alien_target_y - alien.y ) * ALIEN_SPEED

						alien.transition = transition.to( alien, { y=alien_target_y,
																	time=t,
																	delay=300,
																	onComplete=remove_alien } )
					end

				else
					remove_alien( alien )
				end
				remove_bullet( bullet )
				break
			end
		end
	end
end
Find the comment in the function above. Here you can see a call to make_explosion( alien.x, alien.y ). This creates a new explosion at the location of the enemy. You might have also placed the explosion at the location of the bullet instead.
Here’s full listing:
Continue reading Corona – Tower Defense Game Experiments 13